Home / Blog / Deep Linking In Flutter
Deep Linking In Flutter
Jun 6, 2025.8 min read

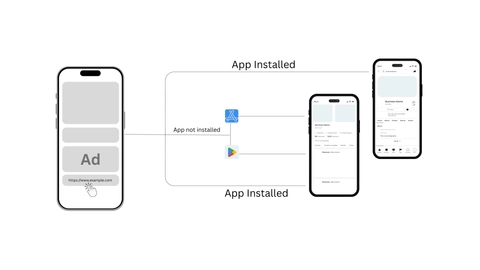
Deep linking is a concept in app development where an url gets connected to an app and different pages of the url refers to corresponding screen in the app.
Now a days deeplinking became too much popular when an app and website refers to the same product and we usually redirect user from website to app to have the best experience out of the product.
We often share post, video from many platforms like youtube or any social media and we actually shares an link but surprising the link directly opens the app on a specific screen that we have shared.

How to setup deeplinking for different platform like Android and IOS.
Domain Ownership verifcation
Sign the the app and get the SHA256 certificate(Android only)
How to verify domain ownership?
To verifiy domain ownership, there are seperate processes for andoid and IOS.
Android
For andoid we need to host json file in the specific domain and the json file must be accisible publically at https://<--DOMAIN-->/.well-known/assetlinks.json
[
  {
    "relation": ["delegate_permission/common.handle_all_urls"],
    "target": {
      "namespace": "android_app",
      "package_name": "<--ANDROID_PACKAGE_NAME-->",
      "sha256_cert_fingerprints": [
        "SHA 256 Certificate which is used to sign the android app"
      ]
    }
  }
]
We need to set the domain on android/app/src/main/AndroidManifest.xml
<manifest xmlns:android="http://schemas.android.com/apk/res/android">

    ....

    <uses-permission android:name="android.permission.INTERNET"/>

    <application>

        <activity>

           ...

         <intent-filter android:autoVerify="true">
            <action android:name="android.intent.action.VIEW" />
            <category android:name="android.intent.category.DEFAULT" />
            <category android:name="android.intent.category.BROWSABLE" />
            <data android:scheme="https" android:host="<--YOUR DOMAIN-->" android:pathPattern=".*" />
            </intent-filter>

        </activity>
    </application>

    ....

</manifest>
In the above example just remove the YOUR DOMAIN with the actual one. Now just build a signed apk with same signature and you are good to go, android will auto verify associated links with and redirect to the app.
IOS
For IOS we need to host file without any extension in the specific domain and the file must be accisible publically at https://<--DOMAIN-->/.well-known/apple-app-site-association and this file must served with a header Content-Type : application/json
{
  "applinks": {
    "apps": [],
    "details": [
      {
        "appID": "TEAMID.<--IOS BUNDLE ID-->",
        "paths": [ "*" ]
      }
    ]
  }
}
Create a Runner.entitlements inside IOS/Runner/
<?xml version="1.0" encoding="UTF-8"?>
<!DOCTYPE plist PUBLIC "-//Apple//DTD PLIST 1.0//EN"
"http://www.apple.com/DTDs/PropertyList-1.0.dtd">
<plist version="1.0">
<dict>
  <key>com.apple.developer.associated-domains</key>
  <array>
    <string>applinks:<--YOUR DOMAIN--></string>
  </array>
</dict>
</plist>
Add the following entries in IOS/Runner/Info.plist
<?xml version="1.0" encoding="UTF-8"?>
<!DOCTYPE plist PUBLIC "-//Apple//DTD PLIST 1.0//EN" "http://www.apple.com/DTDs/PropertyList-1.0.dtd">
<plist version="1.0">
	<dict>

               ...

		<key>CFBundleURLTypes</key>
		<array>
	           <dict>
		      <key>CFBundleURLSchemes</key>
		      <array>
			   <string> <--YOUR DOMAIN--> </string>
		      </array>
	            </dict>
		</array>
		<key>NSUserActivityTypes</key>
		<array>
	           <string>NSUserActivityTypeBrowsingWeb</string>
		</array>
		<key>CFBundleAssociatedDomains</key>
		<array>
			<string>applinks:<--YOUR DOMAIN--></string>
		</array>
		<key>UIStatusBarHidden</key>
		<true/>
		<key>UIViewControllerBasedStatusBarAppearance</key>
		<false/>
	</dict>
</plist>
In the above examples just remove the YOUR DOMAIN with the actual one and you are good to go.
Sign the app and get SHA 256 certificate
For android only we need to sign apk for a successfult verification, lets explore the flutter way to wo do this process.
We need a .jks signature file
Configure build settings
Lets generate key.jks file by running the following command
keytool -genkey -v -keystore key.jks -keyalg RSA -keysize 2048 -validity 10000 -alias keyIt will ask several questions, Enter them promtly, just remeber the passwords it ask to enter and save it somewhere. After that you should get a key.jks file now just store it inside android/app/release-key.jks
Now create a key.properties file inside android/
storeFile=key.jks
storePassword=<--PASSWORD ENTERTED DURING CREATION OF key.jks-->
keyAlias=key
keyPassword=<--PASSWORD ENTERTED DURING CREATION OF key.jks-->
now we have to configure build settings at android/app/build.gradle.kts
...
import java.util.Properties
import java.io.FileInputStream
...

plugins {
    id("com.android.application")
    id("kotlin-android")
    id("dev.flutter.flutter-gradle-plugin")
}

...
val keystorePropertiesFile = rootProject.file("key.properties")
val keystoreProperties = Properties()

if (keystorePropertiesFile.exists()) {
    keystoreProperties.load(FileInputStream(keystorePropertiesFile))
}
...

android {

    ...

    signingConfigs {

        if (gradle.startParameter.taskNames.any { it.contains("Release") }) {

            create("release") {

                storeFile = keystoreProperties["storeFile"]?.let { file(it) }
                storePassword = keystoreProperties["storePassword"] as String
                keyAlias = keystoreProperties["keyAlias"] as String
                keyPassword = keystoreProperties["keyPassword"] as String

                enableV1Signing = true
                enableV2Signing = true
                enableV3Signing = true
                enableV4Signing = true
            }
        }
    }

    buildTypes {

        if (gradle.startParameter.taskNames.any { it.contains("Release") }) {

            release {
                signingConfig = signingConfigs.getByName("release")
                isShrinkResources = false
                isMinifyEnabled = false
                proguardFiles(
                    getDefaultProguardFile("proguard-android-optimize.txt"),
                    "proguard-rules.pro"
                )
            }
        } else {

            debug {
                signingConfig = signingConfigs.getByName("debug")
            }
        }
    }

   ...
}

flutter {
    source = "../.."
}
To get the SHA256 certificate run the following command buy replacing YOUR PASSWORD with actulat one in the directory where you have generate the key.jks file
keytool -list -v -keystore key.jks -alias key -storepass <--YOUR PASSWORD--> -keypass <--YOUR PASSWORD-->you should see some response like that
Keystore type: JKS
Keystore provider: SUN

Your keystore contains 1 entry

Alias name: key
Creation date: Jun 6, 2025
Entry type: PrivateKeyEntry
Certificate chain length: 1
Certificate[1]:
Owner: CN=Your Name, OU=Your Org Unit, O=Your Org, L=Your City, ST=Your State, C=IN
Issuer: CN=Your Name, OU=Your Org Unit, O=Your Org, L=Your City, ST=Your State, C=IN
Serial number: 4a5e8d19
Valid from: Fri Jun 06 18:00:00 IST 2025 until: Tue Oct 24 18:00:00 IST 2050
Certificate fingerprints:
         MD5:  A1:B2:C3:D4:E5:F6:11:22:33:44:55:66:77:88:99:00
         SHA1: 1A:2B:3C:4D:5E:6F:7A:8B:9C:0D:1E:2F:3A:4B:5C:6D:7E:8F:90:A1
         SHA256: AB:CD:EF:01:23:45:67:89:AB:CD:EF:01:23:45:67:89:AB:CD:EF:01:23:45:67:89:AB:CD:EF:01:23:45:67:89
Signature algorithm name: SHA256withRSA
Subject Public Key Algorithm: 2048-bit RSA key
Version: 3

Extensions:

#1: ObjectId: 2.5.29.14 Criticality=false
SubjectKeyIdentifier [
KeyIdentifier [
      0000: A1 B2 C3 D4 E5 F6 11 22   33 44 55 66 77 88 99 00  ......."3DUfw...
   ]
]
You have to copy the SHA256 value and set in the assetlinks.json file.
Wow we are good to go, just build a signed apk with the command
flutter build apk --releaseit will generate a signed apk at build/app/outputs/flutter-apk/app-release.apk
Now after intalling the app the app sould auto vefiry the domain, to check that go the app info > open by default , there you should see 1 verified link
Happy Deeplinking

