Home / Blog / Mount S3 Bucket As Local Drive
Mount S3 Bucket As Local Drive
Oct 27, 2025.7 min read

Effortlessly connect your Amazon S3 bucket as a local drive on Windows or Linux, allowing you to access, manage, and sync your cloud files seamlessly.
Prerequisites
A valid domain name
A server having atleast 1VCPU and Ubuntu with Port 80 and 443 opened
A S3 bucket with Access Key Id and Secret Key Id
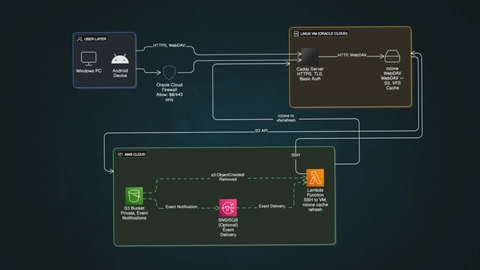
The goal is to mount an Amazon S3 bucket as a secure, always-accessible network drive that can be used from Windows File Explorer and Android devices, using a Linux VM as the gateway.

Components and flow
Windows/ Linux/Android or any Client
Access the storage using HTTPS.
Can upload/download files directly through the file explorer.
Caddy Server (on Linux VM)
Listens on ports 80 and 443.
Handles TLS/SSL certificates using Let’s Encrypt.
Uses Basic Authentication (bcrypt hash).
Acts as a reverse proxy to the rclone WebDAV service (localhost:8080).
rclone WebDAV Server
Runs on the same Linux VM at localhost:8080.
Configured with
--vfs-cache-mode writesand--rcenabled.Connects to an AWS S3 bucket as the backend storage.
Provides read/write access to S3 via the WebDAV protocol.
AWS S3 Bucket
Private bucket storing all files.
Has event notifications configured for
s3:ObjectCreated:*ands3:ObjectRemoved:*
AWS Lambda Function
Triggered by S3 events.
Uses the
ssh2Node.js library to securely connect (via SSH key) to the Linux VM.Runs
rclone rc vfs/refresh --remote s3-nas:ez-nasto refresh cache after direct S3 uploads.
Implementation
Before proceeding i'm expecting that you have all prerequisites
Configure rclone with S3 bucket
connect with the vm with ssh and follow
sudo apt update && sudo apt upgrade -ysudo apt install -y rclone caddy unziprclone configit will ask few questions answer them like this
n) New remote
name> s3remote
Storage> s3
provider> AWS
env_auth> false
access_key_id> <YOUR_AWS_ACCESS_KEY>
secret_access_key> <YOUR_AWS_SECRET_KEY>
region> ap-south-1     # or whichever your bucket is in
endpoint> (leave blank)
location_constraint> (same as region)
acl> private
Edit advanced config?> n
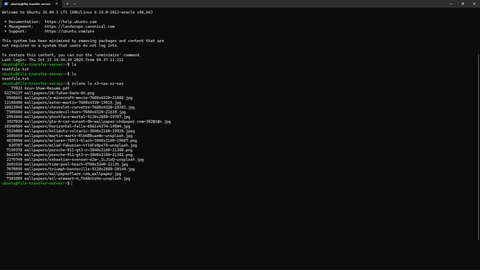
Now upload few files in s3 bucket from aws console, the execute the below command to verify. If you do everything correctly it should list the files stored in the bucket.
rclone ls <REMOTE_NAME>:<BUCKET_NAME>
Setting up rclone webdav server
Lets a create a systemd service so our service keeps running in the background and restart across reboots.
sudo nano /etc/systemd/system/rclone-webdav.servicepaste the following content there and replace REMOTE_NAME and BUCKET_NAME with your's one and type ctrl+O the ctrl+X
[Unit]
Description=Rclone WebDAV Server
After=network.target

[Service]
User=ubuntu
ExecStart=/usr/bin/rclone serve webdav <REMOTE_NAME>:<BUCKET_NAME> --addr localhost:8080 --vfs-cache-mode writes
Restart=on-failure

[Install]
WantedBy=multi-user.target
Start the service with the below commnads
sudo systemctl daemon-reload
sudo systemctl enable --now rclone-webdav
The webdav server should be running in localhost:8080
Configure caddy
We have to setup caddy to make this server accessible via our domain along with https.
Create a hashed password
caddy hash-password --plaintext <Any_password>sudo nano /etc/caddy/Caddyfiletest.arunshaw.in { #use your domain here
reverse_proxy 127.0.0.1:8080
basicauth /* {
#username hashed_password
test $2a$14$8.P3PhwobmZxdfyWDy6LJOgG88i1MdFOYYeW
}
}After configure just ctrl+o then ctrl+x to save to file, now to verifiy the configuration, type the following commnad
sudo caddy validate --config /etc/caddy/CaddyfileNow we have to make a dns record to our domain provider
Type : A
Value : Your server public ipv4 address
subdomain : if any (in my case it is "test")
Now run
sudo systemctl enable --now caddyIf everything went correctly, the server should serve files at https://test.arunshaw.in
Mount as local drive in windows
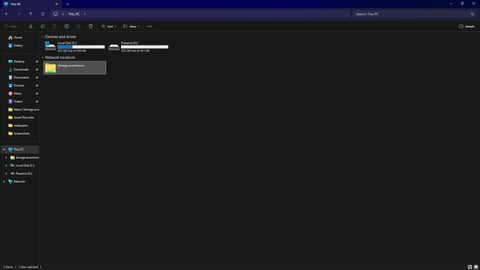
First open This PC, right click on blank space and select add a network location, and there it will ask few things
Network address : enter full domain with https (e.g https://test.arunshaw.in)
Username : Same as we configured in the CaddyFile
Password : Enter the plaintext password (not the hashed one)
Now you will see the s3 bucket files should be shown in new driver under newtwork location.

Found something unclear or facing any setup issues? Drop me an email at arunshaw433@gmail.com, and I’ll do my best to assist you.

