Home / Blog / Search Engine Optimization On NextJs
Search Engine Optimization On NextJs
Jun 9, 2024.11 min read

Welcome to the comprehensive guide on Search Engine Optimization (SEO) for Next.js. In this blog, we'll dive deep into the strategies and techniques you need to boost your Next.js website's visibility and crawlability on on search engines.
Table Of Content
By following all the techniques below, we can optimize our web application to get better visibility for search engine crawlers.
Server Side Rendering (SSR)
Meta Tags
Sitemap.xml
Robots.txt
Schema Markup (ld+json)
Caching
Image Optimization
lets deep dive into the comprehensive guide on Search Engine Optimization (SEO) for Next.js.
Server Side Rendering (SSR)
Server side rendering is a very popular technique in web development where data getting fetched in the server only and the final response comes to the client is a fully baked html that directly gets pained in the browser window and it not only improves user experience also it enables great visibility of the content to the search engine crawlers.
How to do server side rendering in NextJs?
// page.jsx

const fetchData = async () => {
    const response = await fetch(url);
    const json = await response.json();
    return json;
}

const page = async () => {
    const data = await fetchData();

    return (
      <div>
          {data.map((item) => (<p> {item.title} </p>))}
      </div>
    )
}

export default page;
Since NextJs supports React Server Component, we will able to make a top level fetch request and block the rest code execution untill the data gets fetched. Through this the entire html goes to the client an it significantly improves visibility of the content in the search engines.
How does it make a difference?
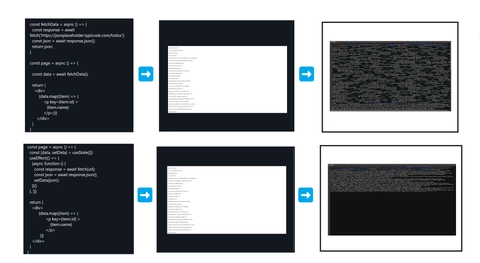
To understand the differences lets understand how crawlers read our website. Crawlers usually reads the page source of the html page, we can see the page source by pressing ctrl+u
observe the below image for better understanding

As you can see both code generates the same output on the browser but the page source is different. By using ssr all the content injected into the page source that is why ssr is good for SEO and get better readability in search engines.
Meta tags
Meta tags play an essential part in search engine optimization. This tags usually defines your html page, what kind of content is there.
Lets see which meta tags we need to use for better visibility on search engines
- <title> Page Title </title>
Defines your page title and it shows in the search result card as the title
- <meta name="description" content="Page description"/>
Defines your page description and it also show in the search result card as description
- <meta name="keywords" content="keyword1, keyword2" />
Keywords play a very import role in a webpage to come into search results. The keyword you give here the search engine will filter out them with the keywords and pick the most relevant. Using long keywords improves the chances to come into the search result.
e.g. how to use aws, how to use this software etc.
- <meta property="og:title" content="Page title" />
- <meta property="og:description" content="Page description" />
- <meta property="og:image" content="Image url" />
All the above tags are used to show the content of your website when the url getting shared to any other platform like whatsapp, linkedin etc.
How to add the meta tags in NextJs?
NextJs supports dynamic metadata genaration based api response we can change the meta data. To do this just create function with the exact name generateMetadata, and dont forget to export it. This function will automatically do everything for you.
export async function generateMetadata(){
  const response = await fetch(url)
  const data = await response.json();

  return {
    title: data.title,
    description: data.description,
    keywords: [keyword1, keyword2],
    openGraph: {
      title: data.title,
      description: data.description,
      images: [data.image],
    },
    alternates: {
       canonical: 'https://www.example.com',
    }
  }
}
Sitemap.xml
This files help search engines to know how many page are there in your website.
NextJs provides a way to generate the sitemap.xml dynamically. Just create file sitemap.js and export it inside src > app
//sitemap.js

export default function sitemap() {
  return [
    {
      url: 'https://www.example.com',
      lastModified: new Date(),
      changeFrequency: 'yearly',
      priority: 1,
    },
    {
      url: 'https://www.example.com/about',
      lastModified: new Date(),
      changeFrequency: 'monthly',
      priority: 0.8,
    },
    {
      url: 'https://www.example.com/blog',
      lastModified: new Date(),
      changeFrequency: 'weekly',
      priority: 0.5,
    },
  ]
}
this will generate a sitemap.xml file and it can be accesible at https://www.example.com/sitemap.xml
Robots.txt
This file enables your website to be crawled by the search engine crawlers. With this file we can configure which paths need to crawl and which not to.
Just create a file inside public folder with the exact name robots.txt
User-Agent: * //it means all the crawlers can crawl your website, you can also add specific crawler as well
Allow: /
Disallow: /private/ //disable paths you dont want to crawl

Sitemap: https://www.example.com/sitemap.xml //sitemap url comes here
Schema markup (ld+json)
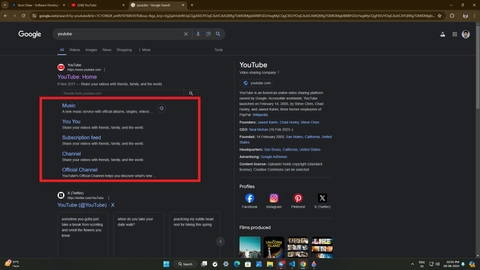
Schema markup is a form of microdata that you can add to your website to improve how search engines interpret and display your content in search results.

This mircodata can be used in many parts in the search engines the screenshot shows on of the usecase.
How to add Schema Markup on Nextjs?
To add schema markup we have insert a script tag which content type should be ld+json and we place our json data just like the below format.
<script type="application/ld+json">
{
  "@context": "https://schema.org",
  "@type": "BreadcrumbList",
  "itemListElement": [
    {
      "@type": "ListItem",
      "position": 1,
      "name": "Home",
      "item": "https://www.example.com"
    },
    {
      "@type": "ListItem",
      "position": 2,
      "name": "Blog",
      "item": "https://www.example.com/blog"
    },
    {
      "@type": "ListItem",
      "position": 3,
      "name": "Latest Blog Post Title",
      "item": "https://www.example.com/blog/latest-blog-post-title"
    }
  ]
}
</script>
//page.js

const generateJsonLd = () => {

  const data = [
    { label: 'Home', url: 'https://www.example.com' },
    { label: 'About', url: 'https://wwww.example.com/about' },
    { label: 'Portfolio', url: 'https://www.example.com/portfolio' },
    { label: 'Blogs', url: 'https://www.example.com/blogs' },
    { label: 'Services', url: 'www.example.com/services' }
  ]

  const breadcrumbs = [];

  for (let index = 0; index < data.length; index++) {
    const item = data[index];
    breadcrumbs.push({
      '@type': 'ListItem',
      position: index + 1,
      name: item.label,
      item: item.url
    })
  }

  return {
    "@context": "https://schema.org",
    "@type": "BreadcrumbList",
    "itemListElement": breadcrumbs
  }
}

const home = async () => {

  const jsonld = generateJsonLd();

  return (
     <div>
        <script
           type="application/ld+json"
           dangerouslySetInnerHTML={{ __html: JSON.stringify(jsonLd) }}
      />
     </div>
  )
}
To know more about schema markup check here
Caching
Caching is a technique where we store the highly processed data in a temporary storage and when we need it we directly take the data from cache instead of doing the heavy processs again. This helps our web page to load faster while we cache the data we get by a api call.
To cache the api call data in NextJs we just need to export a variable call revalidate and we can provide a interval to revalidate the data after that time.
// page.jsx

const fetchData = async () => {
    const response = await fetch(url);
    const json = await response.json();
    return json;
}

export const revalidate = 3600 // revalidate at most every hour

const page = async () => {
    const data = await fetchData();

    return (
      <div>
          {data.map((item) => (<p> {item.title} </p>))}
      </div>
    )
}

export default page;
Image Optimization
Image optimization a essential aspect in search engine optimization. We need to use all the images properly otherwise it will not only decrease the website performance it will also impact page load speed and seo.
The aspects we need keep in mind while optimizing images
Use the right file format (
JPEG,PNG,WEBP)Use properly sized images (give proper
heightandwidth)Use Content Delivery Network (Cloudfront, Cloudinary)
To properly optimize image in NextJs use next Image component
import Image from 'next/image'

export default function Page() {
  return (
    <Image
      src={cdn url}
      width={500}
      height={500}
      alt="Picture of the author"
    />
  )
}
Thank you for joining me in the journey of Search Engine Optimization for Next.js. I hope these tips and techniques help you enhance your website's visibility and performance on Google. Feel free to share your SEO successes and challenges in the comments below. Happy optimizing!

